Sidebar graphics with links ("promotional badges") the Agaric Drupal way
A note of warning about the length of notes to follow: This is site configuration at the point where it verges on developer documentation, such is the power of Drupal, and there's some outright theming in here too. This article is a reaction to doing sidebar graphics the painfully non-Drupal way.
Required modules
- CCK
- Link
- Imagefield
- Imagecache
- Nodequeue
- Views
New content type
Create a new content type. Here is the Content Copy export of the node type we created, with no body (make the body label blank if creating manually) and two fields, a link field and an image field. You would not include the "<?php" tags when pasting into the content import form.
<?php
$content[type]  = array (
  'name' => 'Promo badge',
  'type' => 'promo_badge',
  'description' => '',
  'title_label' => 'Description',
  'body_label' => '',
  'min_word_count' => '0',
  'help' => 'Enter suitable ALT text for the graphic in the Description field.',
  'node_options' =>
  array (
    'status' => true,
    'promote' => false,
    'sticky' => false,
    'revision' => false,
  ),
  'nodefamily_max' => '0',
  'nodeprofile' => 0,
  'comment' => '0',
  'upload' => '0',
  'privatemsg_link' =>
  array (
    'node' => false,
    'teaser' => false,
    'comment' => false,
  ),
  'old_type' => 'promo_badge',
  'orig_type' => '',
  'module' => 'node',
  'custom' => '1',
  'modified' => '1',
  'locked' => '0',
  'fivestar' => 0,
  'fivestar_stars' => 5,
  'fivestar_labels_enable' => 1,
  'fivestar_label_0' => 'Cancel rating',
  'fivestar_label_1' => 'Poor',
  'fivestar_label_2' => 'Okay',
  'fivestar_label_3' => 'Good',
  'fivestar_label_4' => 'Great',
  'fivestar_label_5' => 'Awesome',
  'fivestar_label_6' => 'Give it @star/@count',
  'fivestar_label_7' => 'Give it @star/@count',
  'fivestar_label_8' => 'Give it @star/@count',
  'fivestar_label_9' => 'Give it @star/@count',
  'fivestar_label_10' => 'Give it @star/@count',
  'fivestar_style' => 'average',
  'fivestar_text' => 'dual',
  'fivestar_title' => 1,
  'fivestar_unvote' => 0,
  'fivestar_position_teaser' => 'hidden',
  'fivestar_position' => 'below',
  'fivestar_comment' => 0,
);
$content[fields]  = array (
  0 =>
  array (
    'widget_type' => 'link',
    'label' => 'Link',
    'weight' => '0',
    'description' => '',
    'default_value_widget' =>
    array (
      'field_link' =>
      array (
        0 =>
        array (
          'url' => '',
        ),
      ),
    ),
    'default_value_php' => '',
    'group' => false,
    'required' => '0',
    'multiple' => '0',
    'url' => 0,
    'title' => 'none',
    'title_value' => '',
    'display' =>
    array (
      'url_cutoff' => '80',
    ),
    'attributes' =>
    array (
      'target' => 'default',
      'rel' => '',
      'class' => '',
    ),
    'field_name' => 'field_link',
    'field_type' => 'link',
    'module' => 'link',
    'default_value' =>
    array (
      0 =>
      array (
        'url' => '',
        'attributes' => 'N;',
      ),
    ),
  ),
  1 =>
  array (
    'widget_type' => 'image',
    'label' => 'Promo graphic',
    'weight' => '0',
    'max_resolution' => 0,
    'image_path' => 'promo_graphics',
    'custom_alt' => 0,
    'custom_title' => 0,
    'description' => '',
    'group' => false,
    'required' => '0',
    'multiple' => '0',
    'field_name' => 'field_promo_graphic',
    'field_type' => 'image',
    'module' => 'imagefield',
  ),
);
?>
Create an imagecache preset
Went over to admin/build/imagecache and ended up creating preset 11:
Preset Namespace:
sidebarActions
Action Settings Weight
Scale width: 240, height: , upscale: Yes
We recommend uploading images sized by a designer, but if you upload any image that needs to be sized, it will be set to a width of exactly 240 pixels.
Create the Nodequeue
There's no export from Node queue module to show you, but it's pretty simple.
Here's a screen shot:
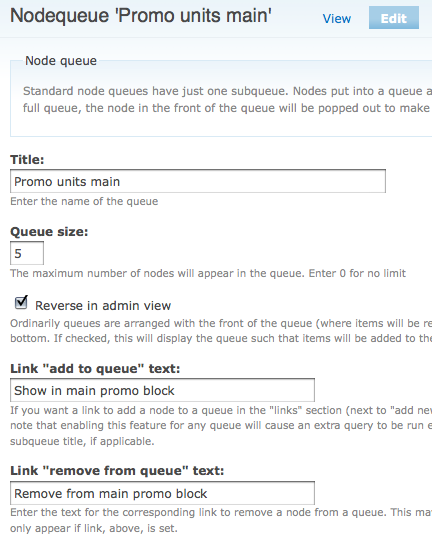
We've titled it Promo units main (please feel free to improve on that), set the queue size quite arbitrarily to 5, reversed in administration view, and, importantly, provided text to use for the add and remove links so administrators will be able to add and remove from the node itself.
The most important part of Node queue configuration isn't in the screenshot: scroll down to "Types" and make sure the content type you just created, Promo badge, can be added to the queue. It should probably be the one and only type that can be.
Create the View
Over to Views, admin/build/views. Nodequeue, wonderful, fantastic nodequeue (yet another MerlinOfChaos module by the way, along with Views itself) creates default views for you:
nodequeue_1 Promo units View node queue Promo units Page, Block nodequeue/1
I added it (rather than enabling it), adding means its ours now, and won't be controlled by the nodequeue module at all.
The main modifications we had to make are unchecking the page view and adding the necessary fields to the field list: the link and the image.
(I used sidebar (plain), the imagecache preset we just created, rather than just Default (in my second go-round), because Views and CCK Imagefield integrates with imagecache. However in this case, as will be described below, we ended up calling imagecache directly and not using the integration in order to have slightly more control over the display.)
Here is the export of that view:
<?php
  $view = new stdClass();
  $view->name = 'promo_badges_main';
  $view->description = 'Promo units main block display.';
  $view->access = array (
);
  $view->view_args_php = '';
  $view->page = FALSE;
  $view->page_title = '';
  $view->page_header = '';
  $view->page_header_format = '1';
  $view->page_footer = '';
  $view->page_footer_format = '1';
  $view->page_empty = '';
  $view->page_empty_format = '1';
  $view->page_type = 'teaser';
  $view->url = 'nodequeue/1';
  $view->use_pager = TRUE;
  $view->nodes_per_page = '10';
  $view->block = TRUE;
  $view->block_title = '';
  $view->block_header = '';
  $view->block_header_format = '1';
  $view->block_footer = '';
  $view->block_footer_format = '1';
  $view->block_empty = '';
  $view->block_empty_format = '1';
  $view->block_type = 'list';
  $view->nodes_per_block = '5';
  $view->block_more = FALSE;
  $view->block_use_page_header = FALSE;
  $view->block_use_page_footer = FALSE;
  $view->block_use_page_empty = FALSE;
  $view->sort = array (
    array (
      'tablename' => 'nodequeue_nodes',
      'field' => 'position',
      'sortorder' => 'ASC',
      'options' => '',
    ),
  );
  $view->argument = array (
  );
  $view->field = array (
    array (
      'tablename' => 'node',
      'field' => 'title',
      'label' => '',
      'handler' => 'views_handler_field_nodelink',
      'options' => 'nolink',
    ),
    array (
      'tablename' => 'node_data_field_link',
      'field' => 'field_link_url',
      'label' => '',
      'handler' => 'content_views_field_handler_ungroup',
      'options' => 'plain',
    ),
    array (
      'tablename' => 'node_data_field_promo_graphic',
      'field' => 'field_promo_graphic_fid',
      'label' => '',
      'handler' => 'content_views_field_handler_ungroup',
      'options' => 'sidebar_default',
    ),
  );
  $view->filter = array (
    array (
      'tablename' => 'nodequeue_nodes',
      'field' => 'qid',
      'operator' => 'OR',
      'options' => '',
      'value' => array (
  0 => '1',
),
    ),
  );
  $view->exposed_filter = array (
  );
  $view->requires = array(nodequeue_nodes, node, node_data_field_link, node_data_field_promo_graphic);
  $views[$view->name] = $view;
?>
Configure the Block
Then headed on over to blocks administration. /admin/build/block
Views creates blocks automatically. We found ours at the very bottom of the list.
Configured the block to show only on the pages we want it to (note that the default selection is to show on all pages except those listed, if that's not what you want make sure to change it to show only on those listed.
Save the configuration and then enable the block by changing the region from None to, in our case, Right sidebar, and setting the weight, and submitting the blocks page.
(Note: You should be doing this on a development site but if per chance you're working live, you can show the block only for an administrative role. Because your sidebar promotional graphics block will not look how you want it yet.
Theme the View
This documentation is already ridiculously long so we'll save you some background on figuring this out and jump straight to the solution:
template.php:
<?php
/**
 * Theme views invoked by view-specific callbacks (see below).
 */
function phptemplate_views_template($template, &$view, &$nodes, &$type) {
  $fields = _views_get_fields();
  $taken = array();
// Set up the fields in nicely named chunks.
foreach ($view->field as $id => $field) {
$field_name = $field['field'];
if (isset($taken[$field_name])) {
$field_name = $field['queryname'];
}
$taken[$field_name] = true;
$field_names[$id] = $field_name;
}
// Set up some variables that won't change.
$base_vars = array(
'view' => $view,
'view_type' => $type,
);
$items = array();
foreach ($nodes as $i => $node) {
$vars = $base_vars;
$vars['node'] = $node;
$vars['count'] = $i;
$vars['stripe'] = $i % 2 ? 'even' : 'odd';
foreach ($view->field as $id => $field) {
$name = $field_names[$id];
$vars[$name] = views_theme_field('views_handle_field', $field['queryname'], $fields, $field, $node, $view);
if (isset($field['label'])) {
$vars[$name . '_label'] = $field['label'];
}
}
$items[] = _phptemplate_callback('views-list-' . $template, $vars);
}
if ($items) {
return theme('item_list', $items);
}
}
/**
* Create functions to catch views' check for theme overrides, and
* pass on to a general function to call templates to output views.
*
* assumed faster than checking if a .tpl.php file exists for every view?
*/
function phptemplate_views_view_list_promo_badges_main(&$view, &$nodes, &$type) {
return phptemplate_views_template('promo_badges_main', $view, $nodes, $type);
}
function phptemplate_views_view_list_promo_badges_earthkeepers(&$view, &$nodes, &$type) { // yeah so it's not perfectly named anymore
return phptemplate_views_template('promo_badges_main', $view, $nodes, $type);
}
?>
And the real excitement in views-list-promo_badges_main.tpl.php, with both files in your active theme directory, of course:
<p><a href="<?php print $field_link_url ?>">
<?php
if (function_exists('_imagefield_file_load')) {
  $file = _imagefield_file_load($node->node_data_field_promo_graphic_field_promo_graphic_fid);
  print theme('imagecache', 'sidebar', $file['filepath'], $title);
}
?>
</a></p>
Resolution
Searched words:
show graphics in sidebar on certain pages linked to featured sections
easily change graphics in specific sidebar block regions
File:

Comments
Do not check off reverse in admin view
Because it literally will only reverse in the admin view, despite the lengthy descriptive text that makes it sound like you might be getting more. So it will just be confusing to have it reversed on the admin page, but the other way around on other Views you make.
Unless, of course, you reverse the order of the other views you make, too!
But just remember it's none or both, and may be easier for everyone's current minds and future sanity to leave the behavior on the edit nodequeue screens as the default, and let people reorder manually as they wish.
Post new comment